#8: Containers and Virtualization + 🍕
1. Introduction
There are generally two big “metrics” we care about when building + shipping software:
- Velocity - how quickly we can build and ship software
- Scale - how many users we can ship our software to
Pretty much all developer tooling aims to solve one or both of these issues - e.g. git aims to make it easier to have multiple developers working on one codebase (improving velocity), the cloud aims to make it easy to balance to any number of users (improving scale). The general ideas of containerization + virtualization (we’ll look at docker, since it’s the most common tool for this) aims to help solve both.
What specific problems are we trying to solve?
-
Easier reproducible development.
The “works on my machine” problem is really quite miserable. Containers and VMs let us create near-identical development and production environments. We can write code that compiles in a reproducible way, and deploy/test it with a consistent operating system and libraries.
-
Scaling up and out.
Internet traffic is pretty variable - a website might go from near zero activity to absolutely heaving in hours. We want to built sites that can scale with traffic, easily adding new machines to handle the traffic. Cloud providers can help us here, but our software still needs to be split into composable units that can scale.
-
Building for a cloud-native landscape.
With the cloud business growing, companies are left with attempting to efficiently split up and sell huge data centers to lots of different customers. Very few customers can (or even want to) rent 100+ core machines with thousands of GBs of RAM - we want to trade in much smaller units, and be more cost-efficient.
To do this, the core idea of containers and virtual machines is to
Split up our big computers into smaller computers
In doing this:
- We don’t have to rent/buy huge machines to run lightweight applications.
- We can easily to add more machines that are running our applications, since we create reproducible templates.
- We don’t have to worry about different dev+prod environments. This also helps break down the barrier between development and operations (called DevOps).
Containerization vs Virtualization
While both of these technologies are about splitting up a big computer into lots of little ones, with lots of similar principles, there are some difference.
To cover the similarities:
- We create containers/VMs from reproducible templates (which we call “images”)
- Each container/VM sees itself at the center of the world - even though there are other containers/VMs alongside them, they are isolated from each other.
- Both can be resource-limited to less than the amount that the host machine actually has.
- Both can be treated as a form of security-boundary to prevent access to the host or other peers 1.
There’s really only one main difference in the techniques: how do you actually perform the isolation?
-
Virtual machines are isolated from the host machine and each other (usually) at the hardware level. Modern instruction sets (like x86/arm/etc) have support for creating virtual machines. Each virtual machine sees itself as it’s own machine, guaranteed by the hardware.
-
Containers are isolated by utilizing low-level primitives in the operating-system (usually Linux) kernel 2. The kernel provides abstractions for isolating processes from each other, called namespaces, and mechanisms for controlling access to shared resources.
That’s the main difference, but this has some big implications on what they up looking like:
- Containers generally run a whole lot faster that virtual machines. We’re splitting less out, and we don’t need to run multiple operating systems, so we generally have a lot less overhead.
- Container images tend to be a lot smaller. We don’t need to ship things like drivers or whole kernels and bootloaders systems around (which can be massive).
- Because of these, it’s really easy to spin up tons of containers - this is nice for creating local dev environments, but also for facilitating entirely new modes of engineering. We can split all of our services into separate components, and manage them all separately - which we call microservices.
Some common software for virtualization:
- VirtualBox, VMWare, QEMU, firecracker vs some common software for containerization:
- Docker, podman, containerd, systemd
2. Technical details
Note
Feel free to skip this section, I got carried away.
Virtualization
Generally, operating systems rely on features of the underlying hardware to protect themselves and isolate their processes from each other. For example, the operating system is allowed to configure page tables for each application (this is completely contrived lol):
- We might put our code in
0x0000-0x1000 - We might put our stack at
0x5000-0x7000 - We might put our general-purpose heap at
0xa000-0xc000
But importantly! An application isn’t allowed to modify it’s own page tables - it has to ask it’s supervisor (the operating system) to do this.
So how is this enforced?
- The supervisor runs in “ring 0” or “el1” or whatever your architecture says.
- The supervisor configures interrupts, that will wait for some trigger to happen (like “some time has passed”).
- The supervisor drops privileges down to the application level “ring 3” or “el0” (yes, depending on architecture, this number is completely arbitrary and can go in either direction, have fuuuun).
- The supervisor maps memory, etc, and then transfers control to the
applications (usually with a
jmpinstruction or something). - The application gets to do whatever it wants - until a trigger happens, and then it’s forcible stopped, and control is returned to the supervisor - which gets put back in it’s elevated priviledge.
Virtualization just extends this by adding more levels (or virtual levels). Now, the supervisor is managed by the hypervisor, in exactly the same way really.
Containerization
Containerization occurs just at the supervisor level, managing applications. But to provide isolation, we need to use capabilities built into the Linux kernel, called namespaces.
Namespaces are hilariously complicated (man 7 namespaces). But generally, each
namespace groups a set of resources: from within a namespace, processes see a
different view of the world.
For example, one of the most interesting resources to isolate is the view of
the directory hierarchy - starting at /, and covering the installed software
in /bin, and the user files in /home. To do this, we use the “mount
namespace”. In Linux, mounts are what goes into the directory hierarchy:
- We might mount an ext4 filesystem on a block device (like a hard drive) to
/ - We might mount an xfs filesystem on a network device (like some network
attached storage) to
/hometo let users access their home directory from any computer in a network. - We also have a ton of weird mounts:
- A temporary filesystem mounted directly in RAM at
/tmp - A magical filesystem called
procfsmounted at/proc- this is insanely cool, you can use this to see all the mounts in your filesystem usingcat /proc/self/mountinfo. - Bind mounts, which create a “mirror” - you might bind mount
/usr/binto/bin, so that every change in/binis mirrored to/usr/binand vice-versa.
- A temporary filesystem mounted directly in RAM at
But, if a container can access the same files as the host then there’s not a
lot of isolation… this is what mount namespaces are for! The docker daemon
(or other software) will create a mount namespace, and then choose it’s own
view of what should be part of it - we could choose entirely different things
to mount, or we could mirror parts of the host system. This way / outside of
the container can have entirely different contents than / in the container!
Linux lets us namespace lots of things. Just to name a few:
- Mount namespaces, like we discussed above.
- PID namespaces. Each running process in Linux gets a PID, and these start from 1, and go up. Each container should see it’s own set of PIDs, so PID namespaces let us do that.
- Network namespaces. Containers should see different network devices, and have different IP addresses, etc. This is what lets us connect containers to each other, and have software-defined networks!
- User namespaces (more experimental, these are called root-less containers). Each container should be able to run as root - so that it can do all the things that the root user needs to be able to do, but we don’t usually want these to be the “actual” root user.
- So many more, that I really do not know the details of.
A small security note
This kind of isolation is very difficult to get correct. You should probably not try to do it yourself, and make sure to rely on tools like docker which have done the hard work for you.
That said, VM/container escapes do happen - if you end up in the unfortunate position of needing to build an application that runs user-controlled code by design, containers are often not accepted as an appropriate security boundary, and usually VMs are relied on (but even then you can still get into trouble).
3. How does docker work?
The most well-known and widely-used container software is Docker - confusingly, Docker is both a set of open source tool for building, running, sharing and deploying containers as well as well as a company building paid products around this.
Some core ideas of Docker:
- Containers are little isolated environments for running your applications (websites, databases, file stores, caching, etc).
- Containers can be created from images (templates for a container).
- Images are shared via registries (often Docker Hub at docker.io).
- Images can be built from
Dockerfiles, which are recipes for building images.
Installing docker
There’s a couple ways of installing Docker on Linux:
- Using your distro’s package manager. However, this generally isn’t fully up-to-date with upstream development.
- Use Docker’s instructions at https://docs.docker.com/engine/install/. These very closely follow upstream.
For Windows and Mac OS, your options are more limited. A few suggestions:
- Use Docker Desktop (a closed-source product from Docker)
- Use WSL (only for Windows)
- Use Lima/Colima (only for MacOS)
You should probably make sure you have a working docker installation before moving on.
4. Hitchhiker’s guide to Docker
Docker has two components - a daemon (dockerd) that runs in the background of
your machine, and a client that you use to connect to it (docker). You
usually won’t need to interact directly with the daemon, and will just use the
docker command for everything.
Pulling an image
Let’s start by pulling a pre-built image with docker pull.
We’ll choose alpine (a popular choice, it’s known for being very small and
minimal):
$ docker pull alpine
Using default tag: latest
latest: Pulling from library/alpine
4abcf2066143: Pull complete
Digest: sha256:c5b1261d6d3e43071626931fc004f70149baeba2c8ec672bd4f27761f8e1ad6b
docker.io/library/alpine:latest
We can list our images with docker images:
$ docker images
REPOSITORY                    TAG       IMAGE ID       CREATED        SIZE
alpine                        latest    05455a08881e   42 hours ago   7.37MB
We can get some information about our image (and pretty much any docker “object”) using
docker inspect:
$ docker inspect alpine
[
    {
        "Id": "sha256:05455a08881ea9cf0e752bc48e61bbd71a34c029bb13df01e40e3e70e0d007bd",
        "RepoTags": [
            "alpine:latest"
        ],
        "RepoDigests": [
            "alpine@sha256:c5b1261d6d3e43071626931fc004f70149baeba2c8ec672bd4f27761f8e1ad6b"
        ],
        "Parent": "",
        "Comment": "",
        "Created": "2024-01-27T00:30:48.743965523Z",
        ...
    }
]
Running a container
Now that we’ve got our container image, we can run something in it using
docker run!
Let’s try running an simple echo command:
$ docker run alpine "Hello, world!"
Hello, world!
Let’s do something a little bit more complicated - we’ll start a shell sh,
and run a few commands with it:
$ docker run -it alpine sh
# echo foo
foo
# echo bar
bar
# exit
Note
See the
-itargument? Fromman 1 docker-run:-i, –interactive=true|false Keep STDIN open even if not attached. The default is false.
-t, –tty=true|false Allocate a pseudo-TTY. The default is false.
You can try running a container shell without either of these to see what happens! Without
-i, we can’t send any input into the running shell, and without-t, we won’t allocate a TTY, so it won’t behave like a normal terminal.
If we run docker ps
in another terminal while we’re doing this, we can see the container we just
created:
$ docker ps
CONTAINER ID   IMAGE                              COMMAND                  CREATED         STATUS             PORTS     NAMES
76e8e3850508   alpine                             "sh"                     4 seconds ago   Up 3 seconds                 pensive_haibt
Once the container stops, it’ll disappear from docker ps.
Let’s do something that’s a bit more realistic though. Let’s start a web
server, we’ll use nginx. This time, we won’t connect input, but we’ll start
it running in the background with -d (for detach), and with -p (for
port) to map port 80 in the container to port 8000 on our host.
$ docker run -d -p 8000:80 nginx
f38152075091fb62e0d17b68f88f7026bdc0a37f1429ab3ee9f8e74b8bb03f46
Once this starts up, we can connect to our custom web server (we could use a web browser, but let’s use curl):
$ curl http://localhost:8000
<!DOCTYPE html>
<html>
<head>
<title>Welcome to nginx!</title>
<style>
html { color-scheme: light dark; }
body { width: 35em; margin: 0 auto;
font-family: Tahoma, Verdana, Arial, sans-serif; }
</style>
</head>
<body>
<h1>Welcome to nginx!</h1>
<p>If you see this page, the nginx web server is successfully installed and
working. Further configuration is required.</p>

<p>For online documentation and support please refer to
<a href="http://nginx.org/">nginx.org</a>.<br/>
Commercial support is available at
<a href="http://nginx.com/">nginx.com</a>.</p>

<p><em>Thank you for using nginx.</em></p>
</body>
</html>
Let’s support we want to see into our logs for our running container - maybe
something isn’t working. For this, we can use docker logs
using the ID/name of our container:
$ docker logs f38152075091fb62e0d17b68f88f7026bdc0a37f1429ab3ee9f8e74b8bb03f46
/docker-entrypoint.sh: /docker-entrypoint.d/ is not empty, will attempt to perform configuration
/docker-entrypoint.sh: Looking for shell scripts in /docker-entrypoint.d/
/docker-entrypoint.sh: Launching /docker-entrypoint.d/10-listen-on-ipv6-by-default.sh
10-listen-on-ipv6-by-default.sh: info: Getting the checksum of /etc/nginx/conf.d/default.conf
10-listen-on-ipv6-by-default.sh: info: Enabled listen on IPv6 in /etc/nginx/conf.d/default.conf
/docker-entrypoint.sh: Sourcing /docker-entrypoint.d/15-local-resolvers.envsh
/docker-entrypoint.sh: Launching /docker-entrypoint.d/20-envsubst-on-templates.sh
/docker-entrypoint.sh: Launching /docker-entrypoint.d/30-tune-worker-processes.sh
/docker-entrypoint.sh: Configuration complete; ready for start up
2024/01/30 09:55:55 [notice] 1#1: using the "epoll" event method
2024/01/30 09:55:55 [notice] 1#1: nginx/1.25.3
2024/01/30 09:55:55 [notice] 1#1: built by gcc 12.2.0 (Debian 12.2.0-14)
2024/01/30 09:55:55 [notice] 1#1: OS: Linux 6.6.14-1-lts
2024/01/30 09:55:55 [notice] 1#1: getrlimit(RLIMIT_NOFILE): 1073741816:1073741816
2024/01/30 09:55:55 [notice] 1#1: start worker processes
2024/01/30 09:55:55 [notice] 1#1: start worker process 29
2024/01/30 09:55:55 [notice] 1#1: start worker process 30
2024/01/30 09:55:55 [notice] 1#1: start worker process 31
2024/01/30 09:55:55 [notice] 1#1: start worker process 32
2024/01/30 09:55:55 [notice] 1#1: start worker process 33
2024/01/30 09:55:55 [notice] 1#1: start worker process 34
2024/01/30 09:55:55 [notice] 1#1: start worker process 35
2024/01/30 09:55:55 [notice] 1#1: start worker process 36
2024/01/30 09:55:55 [notice] 1#1: start worker process 37
2024/01/30 09:55:55 [notice] 1#1: start worker process 38
2024/01/30 09:55:55 [notice] 1#1: start worker process 39
2024/01/30 09:55:55 [notice] 1#1: start worker process 40
2024/01/30 09:55:55 [notice] 1#1: start worker process 41
2024/01/30 09:55:55 [notice] 1#1: start worker process 42
2024/01/30 09:55:55 [notice] 1#1: start worker process 43
2024/01/30 09:55:55 [notice] 1#1: start worker process 44
2024/01/30 09:55:55 [notice] 1#1: start worker process 45
2024/01/30 09:55:55 [notice] 1#1: start worker process 46
2024/01/30 09:55:55 [notice] 1#1: start worker process 47
2024/01/30 09:55:55 [notice] 1#1: start worker process 48
172.17.0.1 - - [30/Jan/2024:09:56:06 +0000] "GET / HTTP/1.1" 200 615 "-" "curl/8.5.0" "-"
...
When we’re done with our server, we can stop it using docker stop:
$ docker stop f38152075091fb62e0d17b68f88f7026bdc0a37f1429ab3ee9f8e74b8bb03f46
f38152075091fb62e0d17b68f88f7026bdc0a37f1429ab3ee9f8e74b8bb03f46
If we do our curl again, the server will have stopped, so it should fail now:
$ curl http://localhost:8000
curl: (7) Failed to connect to localhost port 8000 after 0 ms: Couldn't connect to server
5. Building images
So, we’ve had a bit of a play around with running pre-built images. And this work for running pre-packaged applications: databases, webservers, open-source software, etc. But we also want to package our own software!
Building our own images is usually done from a Dockerfile 3. A Dockerfile
is pretty much the simplest format you could imagine - each line has a
command on it, and the builder runs each command one at a time, to put together
the container image.
For example, let’s suppose I want to extend our web server to display a custom page:
$ ls my-content
index.html
$ cat my-content/index.html
<html>
  <body>
    <h1>Hello, world!</h1>
    <p>This is a test page</p>
  </body>
</html>
I can write a Dockerfile to do this:
FROM nginx
COPY my-content /usr/share/nginx/html
Let’s build that: for this we use docker build:
$ docker build -t myserver .
[+] Building 1.1s (7/7) FINISHED
 => [internal] load build definition from Dockerfile
 => => transferring dockerfile: 86B
 => [internal] load .dockerignore
 => => transferring context: 2B
 => [internal] load metadata for docker.io/library/nginx:latest
 => [internal] load build context
 => => transferring context: 89B
 => [1/2] FROM docker.io/library/nginx
 => [2/2] COPY my-content /usr/share/nginx/html
 => exporting to image
 => => exporting layers
 => => writing image sha256:9cfbc1bad1906bf48ebfe659c4aa68b14c64c433a5040ae2f83b32f75e13ce73
 => => naming to docker.io/library/myserver
Now, if we run docker images, we can see the result in there:
$ docker images
REPOSITORY                     TAG               IMAGE ID       CREATED          SIZE
myserver                       latest            9cfbc1bad190   25 seconds ago   187MB
Let’s spin up and run our server, and do another curl:
$ docker run -d -p 8000:80 myserver
98f8b9e842e2bfd41d289a6415c1829447a9462f6730f2654301e9c368b0f01f
$ curl http://localhost:8000
<html>
  <body>
    <h1>Hello, world!</h1>
    <p>This is a test page</p>
  </body>
</html>
$ docker stop 98f8b9e842e2bfd41d289a6415c1829447a9462f6730f2654301e9c368b0f01f
The builder architecture
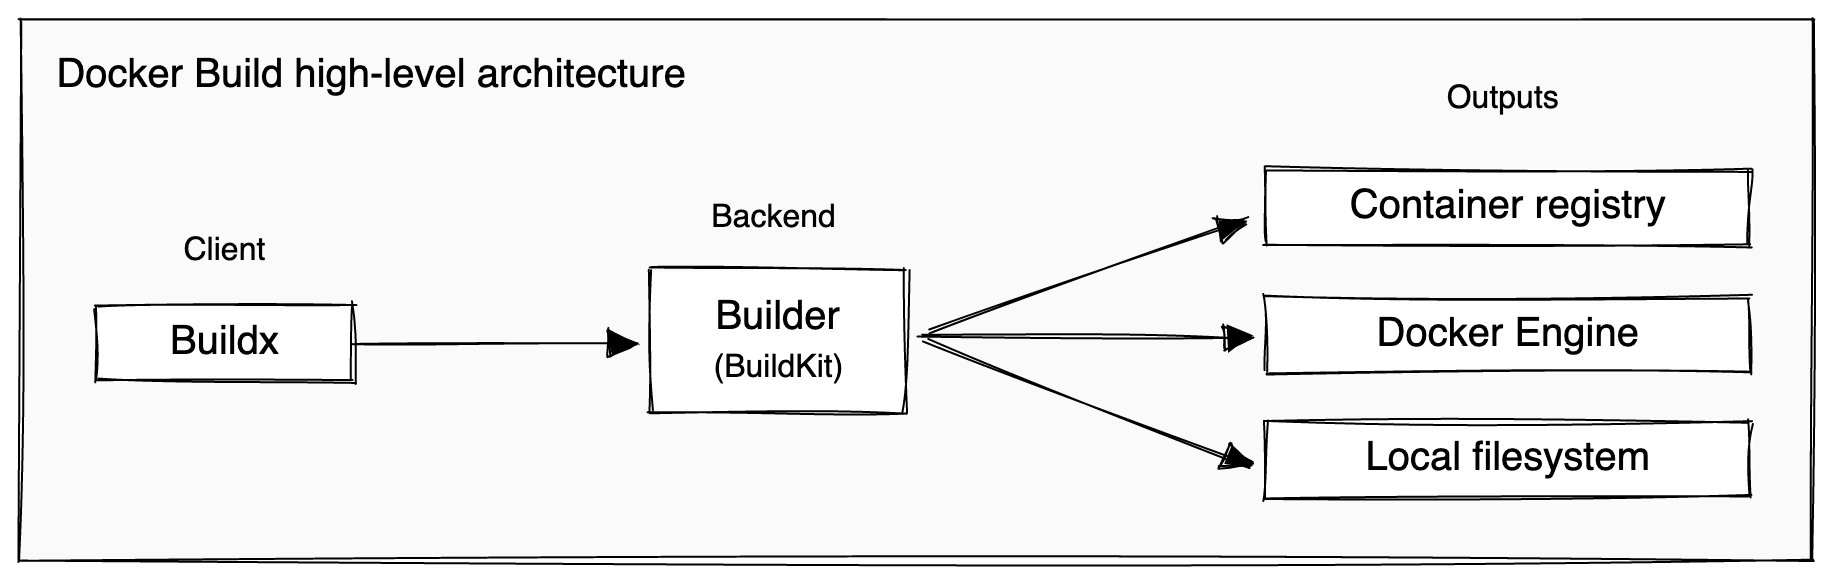
From https://docs.docker.com/build/architecture/.
BuildKit is very cool, and I really could write a lot about it here - but instead you can read about it on https://docs.docker.com/build/buildkit/.
Dockerfiles, a sumamry
Essentially, a Dockerfile is just a text file with newline-separated
commands. Each command “does a thing” to add a new layer to the image.
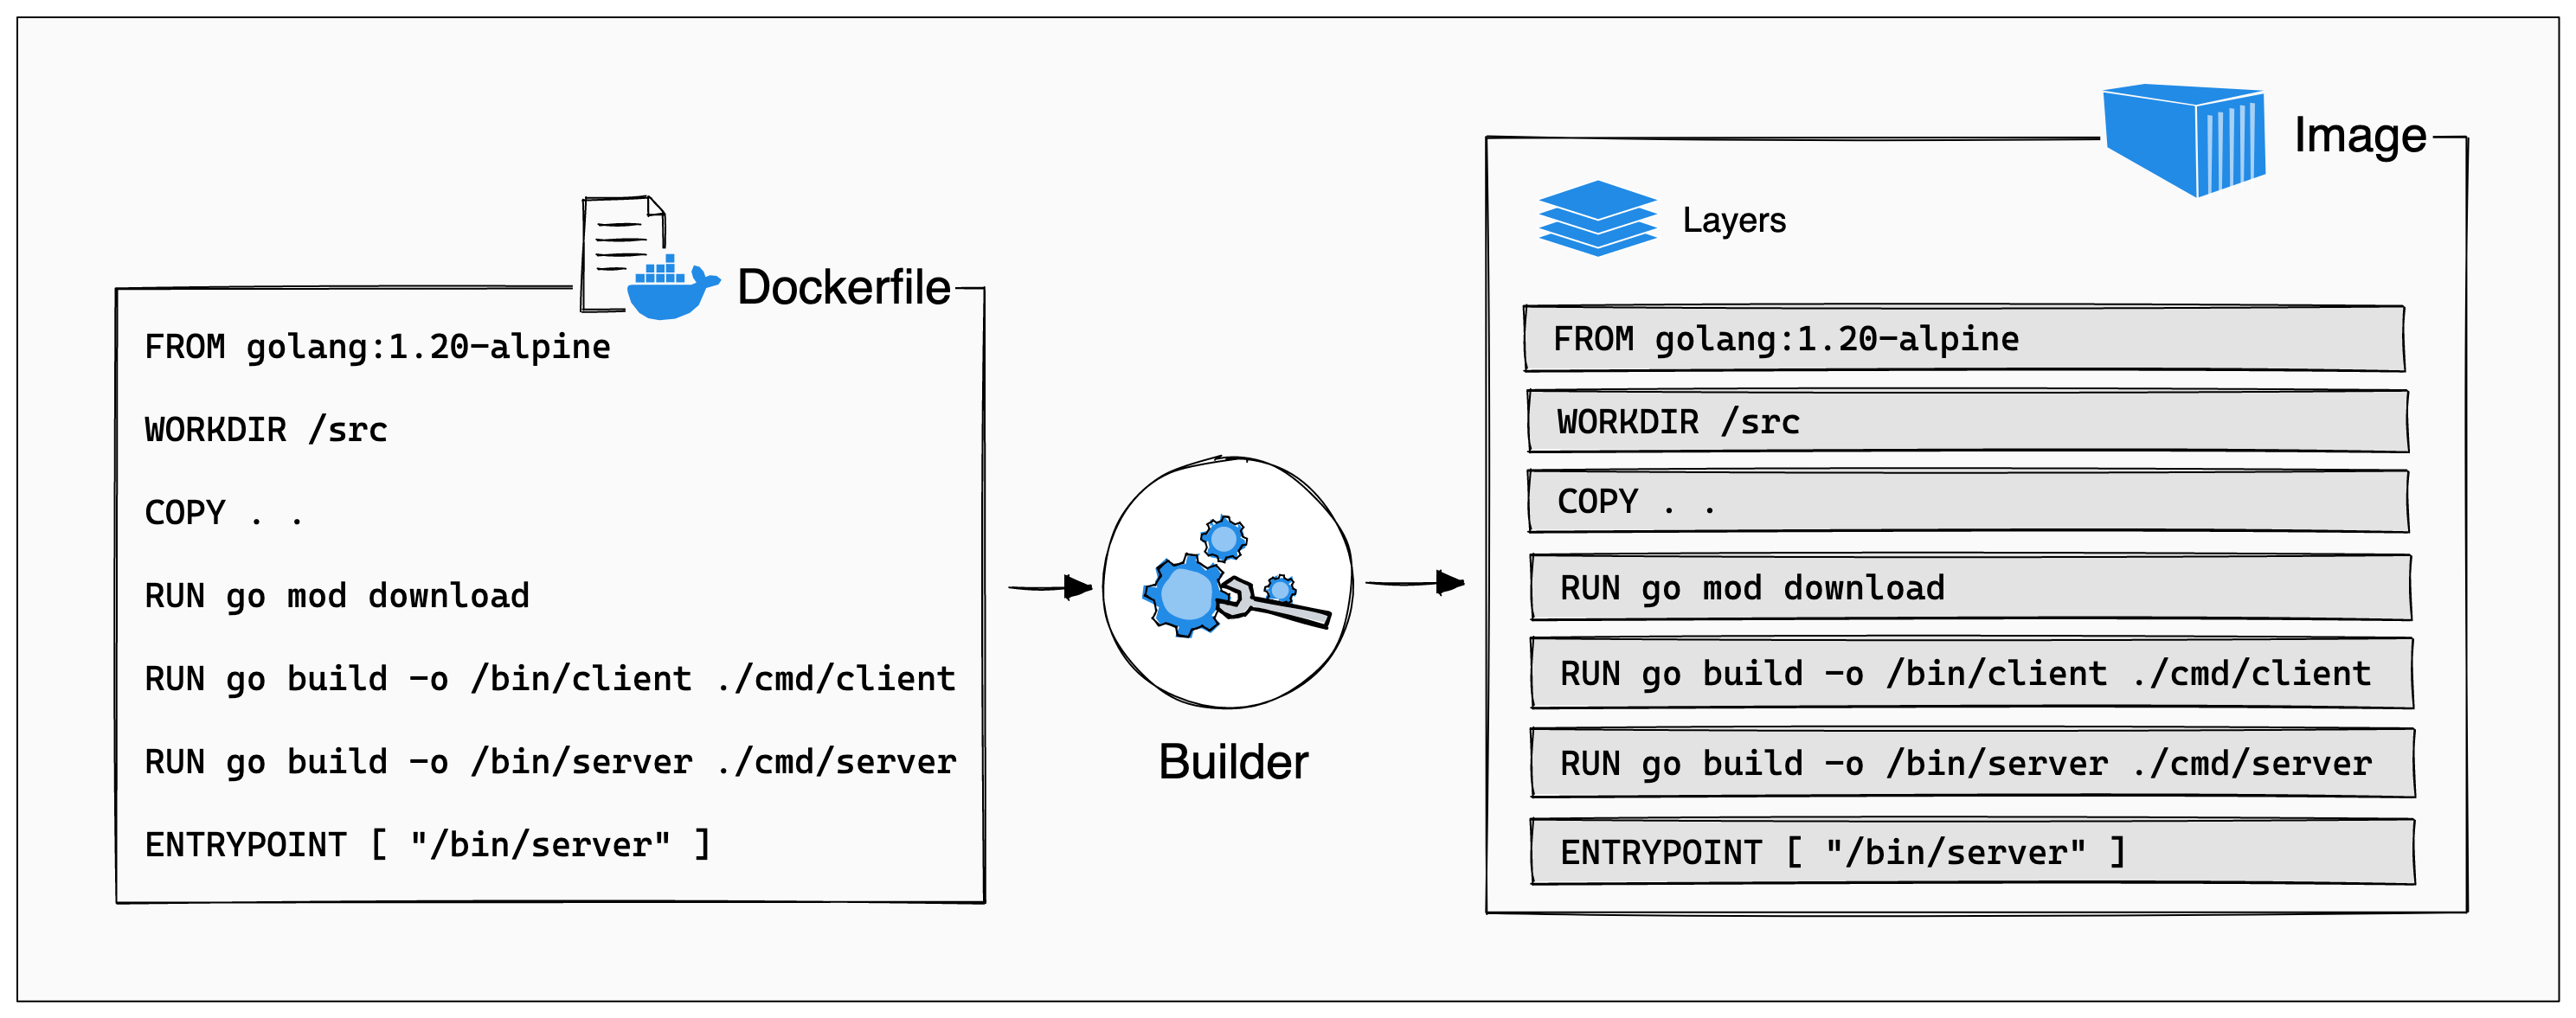
The most common commands you’ll see:
FROMsets the base - this is usually the operating system or language you’re using.ADD/COPYcopies files from the local environment into the builder. You’ll use this to copy around your source code, and other dependencies.RUNexecutes commands in the builder. You’ll use this to install dependencies, execute build commands, etc.WORKDIRsets your working directory in the builder. You’ll use this to change your directory across.CMD/ENTRYPOINT/ENVare hints to the runtime engine that tell it the defaults for how to execute your container.
Put together, you can use these to create isolated and reproducible builds!
Caching
Dockerfiles have a powerful caching mechanism that let you easily re-build images. This is super useful - a really large build might take minutes or even hours - and you want to avoid doing that from scratch as much as possible.
The way that Dockerfiles work is that we will only rebuild a layer once the one before it has changed. So, we want to organize our Dockerfile so that we avoid changing later layers as much as possible.
For example, let’s suppose we’re working on a typescript project, that has a
package.json:
$ ls
main.ts package.json package-lock.json
A naive Dockerfile might look like this:
FROM node
WORKDIR /app
COPY . .
RUN npm install
RUN npm build  # builds main.ts into main.js
CMD node main.js
But - during development, we’ll often be making lots and lots of changes to
main.ts. Because of the caching model, everytime we do that, the COPY step
will need to re-run, and so we’ll have to re-run the install step every time!
A better attempt looks something like:
FROM node
WORKDIR /app
COPY package.json package-lock.json . # this time just grab the package metadata files
RUN npm install
COPY main.ts .
RUN npm build
CMD node main.js
Now, everytime we change main.ts we just need to rebuild it (and not grab all
the dependencies)!
Sometimes though, it can be hard to split up build steps like this - for
example, if we change our dependencies in package.json, we’d have to
re-download every one of them, even if only one has been added.
To solve this, we can use a cache-mount for the RUN step:
...
RUN --mount=type=cache,target=/root/.npm npm install
...
Now, everytime we run npm install, the contents of the /root/npm directory
will be preserved between runs - so any cache that the npm command writes
there can be cached.
Multistage builds
Sometimes, we want to keep our build and runtime environments separately. For example, if we were compiling a C application, we might initally try something like:
FROM alpine
RUN apk add gcc make
WORKDIR /app
COPY . .
RUN make build
CMD ./app
But the problem with this is that we’re now including ALL of GCC (our compiler) in our runtime environment! GCC is pretty huge, so we wanna not do that.
For this, we can use a multi-stage build to split up our “compile” step and our “run” step:
FROM alpine AS compile # note, we name this FROM now
RUN apk add gcc make
WORKDIR /app
COPY . .
RUN make build

FROM alpine
COPY --from=compile /app/app /bin/app
CMD /bin/app
Only the final stage in the multi-stage build is actually stored and uploaded - this saves speed and our precious internet bandwidth.
Moooore
There’s so many features to dive into - you can see the full Dockerfile
syntax at https://docs.docker.com/engine/reference/builder/.
But, one final really cool thing - you can build directly from git repositories. So, to build buildkit itself, you can just:
$ docker build -t buildkit:local https://github.com/moby/buildkit.git
6. Managing containers in production
So, running and deploying containers in production is kinda out of scope for this talk.
But - generally: often we want to have loads of containers, and have them all
connect and talk to each other in huge networks. A simple tool we can use for
this is called docker compose, and is shipped alongside docker.
Here’s a simple docker-compose.yaml file that takes our web server from before:
services:
  web:
    build: .
    ports:
      - "8000:80"
Now to bring up our container, we just need to run:
$ docker compose build
$ docker compose up
We can add all the services we want into here, there’s not really a limit - beyond what your computer can handle.
Orchestration
Generally, this problem of directing how lots of containers should be configured and run together is called “orchestration”.
At the low end, we’ve got tools like docker compose, that can deploy
containers and manage them on a single machine. But often, we’ll want to build
and scale applications across a fleet of machines.
For there kind of applications, at this kind of scale, the most popular tool to use is Kubernetes. It’s both known for being ridiculously powerful, and painfully difficult to manage. Unless you really want to learn it (which you should!) or you are really running into scalability issues, you probably don’t want to use it (but it is really fun).
There’s also lots of paid offerings that cloud providers offer to easily run containers without needing something as complex as Kubernetes.
- Google Cloud offers Google Cloud Run
- Amazon Web Services offers… everything. Lambda, ECS and Fargate would be the things to look into.
- Other clouds exist (Azure does not have my thumbs-up though). They probably have a way of running containers.
Nowadays, most clouds will also offer managed Kubernetes services, which free you from needing to manage the underlying infrastructure. This is super cool, you just say how many machines you want in your cluster, or you can scale up and down as you like (and your wallet allows).
More resources
The docker docs are a really good place to start: https://docs.docker.com.
- There are language-specific guides at https://docs.docker.com/language/ for packaging your application using best practices.
- If you’re interested in building more complex software, the build guide at https://docs.docker.com/build/guide/ is a good introduction to complex builds.
Also, there are often cool labs out there, I can recommend https://labs.iximiuz.com.
Finally, if you hit problems - the Docker Community Slack is responsive, and the maintainers on GitHub are open to bug reports and patches (seriously, they’re cool and very welcoming, definitely a good place to dive into open source). See:
- For the runtime: https://github.com/moby/moby/blob/master/CONTRIBUTING.md
- For the builder: https://github.com/moby/buildkit/blob/master/CONTRIBUTING.md
boundaries, but you do need to be careful. VMs are generally treated as a bit more secure, since they generally require breaks in the hardware, rather than software - when isolating at the software level, it’s very easy to make critical mistakes (believe me).
these exist, they’re not as well known as Linux containers, which are pretty much dominant.
images, buildkit (disclaimer, I’m a maintainer), supports lots of different backends and there’s lots of tooling built on top of it.
Licensed under CC BY-NC-SA.