#5: Version Control (Git)
Note beforehand: this document assumes that you have already installed Git! If you don’t have Git, you can get it at https://git-scm.com/downloads (which I recommend) or via your system package manager (which might be a little out of date but should still work - if something doesn’t try updating first!).
Another note: this document also assumes you’re decently fluent on the command line - if you’re not, go checkout some of the previous talks in the series!
What’s version control?
Version control is a way to understand and track how your code changes over time. It lets you see what things got changed and when, the reasons behind changes and even revert changes that have been made and restore your codebase to how it was at some arbitrary point in the past.
It also has features that make it easy to work collaboratively with other people on your code, by letting multiple people have different versions of the codebase that they’re working on and by providing tools to merge those changes back together when they’re done.
Put simply, version control is a type of really fancy edit history for your code. There are various different version control systems (often shortened to VCS), and virtually every single software project uses one of them, however the most popular is called Git, which is what we’re going to talk about here.
The basics of Git
Repositories
Git has a relatively straight forwards model that it adheres to, the foundation of which is called a repository (often shortened to “repo”). For every project you do, you have a corresponding repository that all the project’s source code, assets and files are stored within.
In order to create a repository, drop into your shell and change into the directory that you want to store your project in. From there, run:
git init <folder name>

git init myProject // will create a directory called `myProject` and initialise a git repository in it
Once you have done this, you can change into that directory and run git status to make sure that it worked - you should see something like this.
On branch main

No commits yet

nothing to commit (create/copy files and use "git add" to track)
Staging and committing files
Usually, the first thing we want to add to a new repository is called a README file - this is a simple text file that describes a little bit about the project and sometimes some instructions as to how to work with and use your project.
Often README files are written in a basic markup language called Markdown, which you can read more about here and has the file extension .md.
A simple README file written in Markdown might look something like this:
# myProject

A tool to frobulate the fractional matrices of retrograde incineration.
If we save this file as README.md in the base directory of our repository, we can then go ahead and start the process of committing it.
A commit can be thought of as a unit of work - each commit should contain one “unit of work”. You can think of a unit of work as a task - something like fixing a bug, or adding a feature, or changing the layout of a page. Generally, you should try to keep commits as self contained as possible, and if you have a big feature that you’re working on you should split that into it’s own branch - but we’ll discuss branches later.
Because commits can contain changes to multiple files, we need to tell Git what files we want to add to our new commit. To do this, we “stage” the files that we want - this is done using the git add command. For example, to stage our new README file, we would run:
git add README.md
You would need to do this the same for any change you make to a file, no matter if it’s creating it like we’re doing here, or editing or deleting it.
Tip: If you’re ever unsure as to what you have and haven’t staged, you can run git status to see what the state of your repository is.
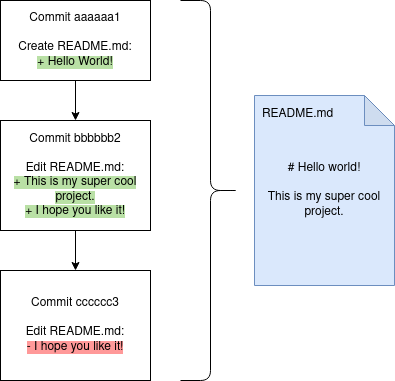
Once we’ve staged everything we want to commit, we can then go ahead and actually make the commit. A commit contains three things - a message explaining what’s in the commit, a set of diffs and a reference to a parent commit. A diff is functionally a list of changes that have been made to a file, and Git uses these in order to construct a history of your code by combining a set of diffs one-by-one using the references to parent commits to reconstruct a copy of a given file at any point in time.
To make a commit, we just use the git commit command, which will open an editor of your choice:
git commit
Write your commit message in the editor (it should be something descriptive, like “add README file” or “fix bug that caused users to be deleted accidentally”), save it and then exit your editor, and Git will create a commit for you!
Optionally, you can write multiple lines in a commit message if you want in order to explain why you made the changes you made. For example, take a look at this commit that I made on one of my projects.
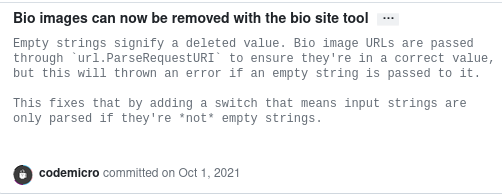
This is a good commit. Not all your commits have to be 7 lines long (most of the time, one suffices), but you should try to keep them descriptive and avoid commits like this one:

Remotes
So far, we’ve only touched on what you can do on your local machine. However, one of the most useful features of Git (and VCSes in general) is its ability to work with remote copies of your code.
This is super helpful as it allows you to easily backup your code and share code between multiple computers and servers that you own and use, but also because it makes it really easy for other people to work on your codebase as well as you.
As the name suggests, a remote is a remote copy of your repository. These are usually hosted on dedicated websites like GitHub or GitLab (but there are many others - the School of Computer Science has their own at https://git.cs.bham.ac.uk) - in this example, we’re going to be using GitHub.
It’s important to remember that Git and GitHub are different things! Git is the piece of software we’re learning about - GitHub is separate website that provides a place for you sync your repositories and provides some additional fancy features on top of that to that make collaboration easier - those extra features are totally separate to Git itself.
Working with a remote
If you’re following along, you’re going to want to make an account on GitHub and follow their instructions to create a repository on their website. Once you’ve done that, you should be able to copy the repository URL that GitHub gives you, which we’re going to need if we want to setup a remote.
With our URL in hand, we need to tell Git about it. We do this with the git remote command.
git remote add origin https://github.com/codemicro/sample.git
Here, we’re telling Git to add a remote to our repository called origin that points to the URL we just gave it. Each repository we add needs a name because Git gives you the option of having multiple remotes, but in this case we want to just use one, so we give it the de-facto name of origin.
However, just because we’ve added a remote to our repository doesn’t mean that our remote repository and our local repository are magically in-sync - we still need to send our changes over to the remote. This is done with the git push command.
The first time you run git push, you’ll have to tell it where to send your changes. You do that like this:
git push -u origin main
and you should see an output that looks something like this:
Enumerating objects: 3, done.
Counting objects: 100% (3/3), done.
Delta compression using up to 8 threads
Compressing objects: 100% (2/2), done.
Writing objects: 100% (3/3), 283 bytes | 283.00 KiB/s, done.
Total 3 (delta 0), reused 0 (delta 0), pack-reused 0
To github.com:codemicro/sample.git
 * [new branch]      main -> main
branch 'main' set up to track 'origin/main'.
Now, we can go back to GitHub and see our code there!
Bear in mind that you might be asked for credentials at this point - if you are, you can enter your GitHub username and password, and it should just work.
Every time you make a local change, you need to make sure you git push it back to your the remote repository to ensure that it’s all up to date. If you don’t git push, your changes won’t be anywhere but on your local machine and nobody else can see them.
You might also need to use git pull - if you’re working on your project with somebody else and they modify the remote repository, you need a way to get their changes on your computer. Running git pull will go and fetch the latest commits from the remote and apply them to your repository so your local repository is up-to-date and in sync with the remote.
Getting repositories that already exist
Let’s say that somebody has a repository full of code that you want to get on your local machine to have a play with.
Lucky for you - this is super simple thanks to the git clone command. It works a little bit like git init, but instead of providing a directory to put your new repository in, you provide a repository URL and it will put the repository in a folder of the same name as the repository - but you can change this. For example:
git clone https://github.com/codemicro/sample.git # clones into a directory called `sample`

git clone https://github.com/codemicro/sample.git hello # clones into a directory called `hello`
Once you’ve done this, you can change into the directory with your new repo in and use it as normal!
Branches
Branches are a really neat, albeit slightly confusing, feature of Git.
You can think of a branch as a way of having two different, potentially conflicting, sets of edits in a repository at once that you can switch back and forwards between at will and that can eventually be merged into one.
An example of when you might want to use a branch is when you want to add a big feature to your repository that will take, say, a week to write, but you don’t want to keep the leave the repository in a slightly broken state while you’re working on it. Here, you would create a new branch, implement your changes there, and then “merge” your changes back into the main branch.
To make this crystal clear, here’s a diagram:

In this, both branches start at commit A, have changes made to them independently (commit B and commits D, E and F) and then the feature branch is merged back into the main branch as commit C. None of the changes that you make on the feature branch show up on the main branch (and vice versa) until they’re merged back together.
When you create a new Git repository, Git automatically creates a new branch for you called main (that’s what the git push -u origin main thing that we did earlier was referencing!). When you create new commits, you’re adding them to this main branch. You can see this for yourself by running the git branch command and see a list of all the branches in the repository, with the one you’re currently on highlighted.
$ git branch
* main
If you want to make a new branch based off of the current state of the main branch, you use the git branch command followed by the name you want the branch to have. To create a branch called my-awesome-feature, you would run
git branch my-awesome-feature
and you should be able to see it in the master list of Git branches!
$ git branch
* main
  my-awesome-feature
… but it shows that we’re still on the main branch! What gives??
To change between branches, you use the git switch command along with the branch name you want to move to.
$ git switch my-awesome-feature
Switched to branch 'my-awesome-feature'
$ git branch
  main
* my-awesome-feature
And just like that we can start making some commits. Let’s create a new file and commit it.
$ cat > hello.txt << EOF
> Hi there! It's nice to meet you.
> EOF
$ git add hello.txt
$ git commit -m "Add hello.txt"
[my-awesome-feature d39cab9] Add hello.txt
 1 file changed, 1 insertion(+)
 create mode 100644 hello.txt
Just like as before, we can also push our changes to our remote so other people can see them. Since this is the first time we’re pushing from our new branch, we’ll have to use the -u flag again.
git push -u origin my-awesome-feature
If we then git switch back to main and run ls, we can see that hello.txt has vanished! In order to make it show up, we’ll have to merge my-awesome-feature back into main. First, make sure you’re on the branch that you want to merge your changes into (so in this case that’s main), and then run git merge:
$ git merge my-awesome-feature
Updating 92c026e..d39cab9
Fast-forward
 hello.txt | 1 +
 1 file changed, 1 insertion(+)
 create mode 100644 hello.txt
and now you should be able to run ls and see hello.txt!
Since we’re done with our new branch, we can delete it to reduce clutter. This is done with a flag that gets passed along with the git branch command, like so:
$ git branch --delete my-awesome-feature
Deleted branch my-awesome-feature (was d39cab9).
Ways to make Git less confusing
Git is big, complicated and hard. It gets easier once you’ve got the basics down, the learning curve is still pretty steep (but it is worth it!).
Lots of people like using graphical interfaces to work with Git instead of the command line. There are lots of these available, but some notable mentions are:
- GitHub Desktop - https://desktop.github.com/
- Made by GitHub
- GitKraken - https://www.gitkraken.com/
- Really slick and easy to use
- Free with the GitHub Education Student Developer pack - https://education.github.com/pack/offers
- GitExtensions - https://gitextensions.github.io/
- Windows-only
- What I used to use!
Git tips and tricks
Here’s a couple of extra little tricks that you might find especially useful when you’re using Git
Ignoring files
Got files in your repository that you never want to commit? Think configuration files with secrets in them, intermediary representations of your programs or databases?
If you drop a file called .gitignore in the base directory of your repository and commit it, Git will never show you options to stage/commit those files!
For example, a .gitignore file that ignores any file called config.yml, any file that has the .o file extension and the run directory in the base of your repository would look like this:
config,yml
*.o
/run/
Learn more about .gitignore files here: https://git-scm.com/docs/gitignore
Custom Git commands
If you want to make a custom command, put an executable file on your PATH with a name that starts with git-!
For example, putting this Python script somewhere on your PATH and calling it git-autoacommit will mean you can run git autocommit to have Git write your commit messages for you!
# nano hello.txt
# git add hello.txt
# git autocommit
[main 0c9140d] Update `hello.txt`
 1 file changed, 3 insertions(+), 1 deletion(-)
Other useful links
- Git’s own introductory guide: https://git-scm.com/docs/gitcore-tutorial
- Julia Evans’ confusing Git terminology post: https://jvns.ca/blog/2023/11/01/confusing-git-terminology
Licensed under CC BY-NC-SA.